Friday, December 31, 2010

One Little Word:2011

This will be my third year doing this and I love it!
I chose a word (or sometimes it chooses me) to focus on for the upcoming year.

Two years ago my word was Simplify.
I just felt like life was getting so very complicated and wanted to slow down.

Last year my word was Thrive.
I wanted to grow in who I am as a wife, mother, friend and child of God.
I feel like I did all of those things.

This years word was going to be Intentional.
After researching word definitions
I started to see a pattern in the words I was being drawn towards:
Wordle: 2011 Words
They are all words that require action!

Diligent:
Characterized by steady, earnest and energetic effort.

Earnest:
Serious in intention, purpose or effort.

Purpose:
To intend, by design

Intention:
Done on purpose.

Endeavor:
To work with set purpose.

Effort:
Conscious exertion of power; hard work

Conscious:
Acting with critical awareness.

Steadfast:
Unwavering or determined in purpose, loyalty

Strive:
To devote serious effort or energy

After pondering all these words the one that stood out to me the most was Diligent.

This year:
I will be diligent in spending time with God.
I will be diligent in investing in my marriage.
I will be diligent in raising my children.
I will be diligent in living healthfully.
I will be diligent in my housekeeping.
I will diligently learn new things
I will diligently enjoy life.

What is your word for 2011?
If you need some inspiration for your word here is Ali Edwards post on the subject.
You will find tons of great words in the comments section.
Amy Signature

Monday, December 27, 2010

21 Day Organizing Challenge

Challenge Accepted!
(How I Met Your Mother reference)

This morning while going through my reader I came across this post by House of Hepworths about this great organizing idea that she highlighted by another blogger,
A Bowl Full of Lemons.

I popped over to check it out and fell instantly in love. She is so organized! Starting January 1st she is hosting an organization party to help all of us who are not so great at it. She will post an organizing challenge every day(excluding Sundays) for us to do and then asks that we blog about it.


I am so excited! I love when things are organized,
but I have a hard time getting there on my own. 

 Anyway, go check her out and let's start this new year off right.


Amy Signature

Sunday, December 12, 2010

Mug Rug Tutorial

 This is a Mug Rug:
Basically it's a coaster that is big enough for a cup of something(COFFEE)
and a treat of some kind. Yum! 
Seriously, if you can sew a straight line you can make this!

For this project you will need:
Sewing Machine
Matching or Contrasting Thread
Fabric
Self-Healing Mat
Ruler
Rotary Cutter
Pins
Thread Scissors
Iron
Cup of coffee

I wanted my finished project to be 5"x10" so all these measurements are for that.
All seam allowances are 1/2 inch.
 Cut:
Top Border (2) 2"x11" (Polkadots)
Side Border (2) 2"x4" (Polkadots)
Window (8) 2"x8" (I used 4 different fabrics and did 2 of each one)
Back (1) 6"x11" (Snowmen)
Batting (1) 5"x10"

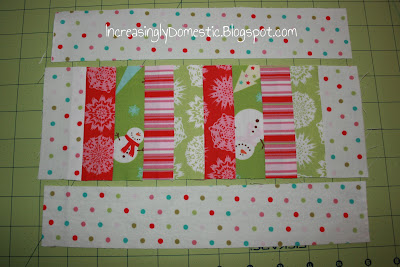
 Lay out your window fabric pieces in the order that you want them.

Take the piece on the left and flip it over so that it is 
top-to-top with it's next door neighbor.

Pin on the left side.

Do the same to the rest of the pieces.

Run the pieces through your machine. Don't bother back stitching or stopping between pieces. If you look at the picture above you can see that I did one piece and then just sent the next piece behind it. When you have done all 4 pieces you can cut them apart. 
It saves time and thread:)

Press each piece open with the seam to one side. I pressed my seams to the pink side because I am a freak like that. First born, remember?

Lay them out again and then repeat what you just did.

Pin the pieces top-to-top and run them through the sewing machine.

Press open. Make sure that you press the seams in the same direction as before (at this point I was pressing toward the green fabrics). 
Pin the final two pieces top-to-top, sew and then press.

See? Aren't the seams so pretty?

Here is the front so far. Adorable, right?

I had been planning on doing a diagonal cut, but then changed my mind once I got my clear ruler over it and saw the fabrics. Straight up and down showed off 
their adorableness so much better.

Cut it down from the 8 inches to 4 inches.
I put the scraps aside for another little project that I will share with you soon.

Pin and sew the side border pieces on.
I really could/should have done this before I made that last cut, 
but whatever, it worked;)

Here it is all pressed and ready to add the top/bottom border pieces.

Pin top-to-top and sew with 1/2 inch seam. I used a ton of pins here because I didn't want my gorgeous seams to flip up when going through the machine. Yeah, I know.

Press open again. The seams naturally wanted to go out, so go ahead and let them.

Here's the back.

Take your back piece and lay it top-to-top with your pieced front. Pin and sew, leaving a wide opening along one of the long sides for turning and to insert the batting.

Snip the corners, being careful not to cut through the thread. This makes it easier to turn and helps your corners to be nice and square.

Turn it right side out and use something pokey to get your corners nice and sharp.

Press a final time, making sure to press the edges of the turning opening inward so that it will line up with the rest of the piece. Does that make sense? I hope so! Insert batting and make sure it is flat inside your fabrics. I am sure there is some sweet quilty way to do this, so if you know of one please share it with me!

Top stitch around the outside with a small seam allowance to close the turning opening, and then stitch along the edges of the fabric pieces. I stitched along the side that the seam was pressed to for extra staying power.

Now get yourself a mug of coffee and a stack of cookies! You deserve it! (Sorry for the Starbucks add...this is just happens to be my favorite mug)

Oh, and I have to mention that the cookies were made by my husband!
Isn't he great?

Amy Signature


Saturday, December 11, 2010

Alice Skirt

 Little Lizard King asked for some pattern testers for this apron skirt and also asked for some name suggestions. Mine was the Alice Skirt. Whether or not that becomes the name, that is all I can think of now when I look at this adorable skirt!

Here is the skirt that I made with her pattern:
 This skirt is both playful and sophisticated and is so fitting for my 7 year old.

She fell in love with this Art Gallery fabric the minute I brought it home from the fabric store and has been begging me to make her something from it.

This skirt was the perfect thing to make, don't you think?

 Front of the skirt.

 I love the secret pop of color under the apron:)

Here's the back of the skirt.


Playful.

Sophisticated.

We are in love with this skirt! I will be making more for sure:)
Go over to Little Lizard King to check out all her patterns!


I am linking up to these fun parties:)

Amy Signature

Thursday, December 09, 2010

The Gentle Art of Domesticity

My friend Rachel at Stitched in Color wrote about this book and now I am dying to get my hands on it!

Her post has hit me hard and I still have goosebumps on my arms and tears in my eyes as I reflect on it. I would tell you what she wrote, but it would be better for you to read it yourself. It is basically about how our fear of failure has caused us to stop trying.

Go read it: Just give it a try

Amy Signature

Wednesday, December 08, 2010

Muffin Tin Advent & Activities

This is our Advent calendar this year:

It was a gift from one of my sisters last Christmas and I just love it!  

Since the boy is too young for daily candy and tiny things, this year the treats are all for the girl. Each day she gets a chocolate and a couple Silly Bandz...she LOVES them!

Next year I plan to make the boy his own Muffin Tin Advent so that they each have their own with age appropriate things inside.

Something else that I am doing is putting a slip of paper with an activity for the day. Little things like watching a Christmas movie or playing a board game and then bigger things like going rollerskating or visiting Santa:) For a few of the days I have her open a little activity gift.

This is one of the activity gifts...Did you make these things as a kid? I did and when I saw them at the Dollar Tree I had to scoop them up! I found the tin and key chains there as well. I don't remember how to do this, so I will have to google it:)

Nostalgic.

This mug was also at the Dollar Tree and is for the night we go looking at lights. She can have her own little mug of HoCho(Gilmore Girls reference) while we drive around.

Christmas sun catchers! She gets to open these tomorrow.

Tinkerbell is a favorite around here, so I had to get this:)

Do you do things like this during Advent?

Linking up with these super rad parties!
Amy Signature

Tuesday, December 07, 2010

Haul Out the Holly-Day 9

I am guest posting today over at Gwenny Penny
for Haul Out the Holly!


Haul out the Holly,Gwenny Penny,Christmas craft tutorials


Gwen has been such an inspiration to me with her great projects like her Reversible Rick Rack Apron...Not only is it ADORABLE , but it's just fun to say! Try it! ;)  Oh and her Scrap Buster Fall Pillow  and  Acorn Patch Pillow tutorials make me giddy and are on my to do list. Go check out all her tutorials...you will love her!

Hop on over and check out my Quilted Mug Rug tutorial!

Can't you just see this all set up with a mug of something, some cookies and a little sign that says "For Santa"?

Amy Signature
The most important thing she’d learned over the years was that there was no way to be a perfect mother and a million ways to be a good one."
~Jill Churchill